Maintaining healthy, vibrant hair isn’t just about the products you use in the shower; it’s about how you treat your strands while you sleep. Hair wrapping is a time-honored technique that serves as a protective shield for your hair, preventing breakage and locking in moisture. Whether you have curly, coily, or straight hair, mastering how …
Maintaining healthy, vibrant hair isn’t just about the products you use in the shower; it’s about how you treat your strands while you sleep. Hair wrapping is a time-honored technique that serves as a protective shield for your hair, preventing breakage and locking in moisture.
Whether you have curly, coily, or straight hair, mastering how to wrap hair can transform your hair care routine. Here is everything you need to know about the benefits and a professional step-by-step tutorial.
Why Should You Wrap Your Hair? (The Benefits)
If you find yourself waking up with “bedhead,” dryness, or excessive tangles, a nighttime wrap might be the missing piece of your puzzle.
- Retains Essential Moisture: Standard cotton pillowcases act like sponges, soaking up natural oils. A silk or satin wrap keeps those oils where they belong—on your strands.
- Prevents Breakage and Split Ends: Friction from tossing and turning causes hair fibers to rub against each other. Wrapping keeps the hair “still” and protected.
- Preserves Your Style: Whether you’ve just had a professional blowout or a silk press, wrapping helps maintain the sleekness, making your style last days longer.
- Reduces Frizz: By keeping the hair cuticle laid flat, wrapping significantly reduces the morning “halo” of frizz.
Step-by-Step Tutorial: How to Wrap Hair Like a Pro
To get started, you will need a paddle brush or wide-tooth comb, a few non-crease clips (optional), and a 100% silk or satin scarf.
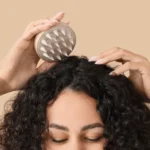
1. Prep and Detangle
Start with dry or slightly moisturized hair. Gently detangle from ends to roots using a wide-tooth comb to ensure a smooth “swirl” without knots.
2. Create the “Swirl” Direction
Using your brush, begin brushing your hair in a circular motion around the head. Most find it easiest to start at the crown, brushing the hair forward toward the forehead, then around the side in a continuous loop.
3. Secure the Sections
As you brush the hair around the circumference of your head, use your palm to smooth it down. If your hair is long or thick, use flat, non-crease clips to hold sections in place temporarily as you work your way around.
4. The Scarf Application
Fold your square silk scarf into a triangle. Place the long edge of the triangle at the nape of your neck and bring the two points to the front of your forehead. Tie a secure (but comfortable) knot.
5. Tucking and Finalizing
Tuck the loose corner of the triangle under the knot at the front. If you used clips, carefully slide them out from under the scarf now to avoid leaving creases in your hair.
Expert Tips for Better Hair Health
- Choose the Right Fabric: Always use 100% silk or high-quality satin. Synthetic blends can cause static or scalp sweating.
- Protect Your Edges: Ensure the wrap is secure but not so tight that it pulls on your hairline, which can lead to tension alopecia.
- Seal the Ends: Apply a tiny drop of lightweight hair oil (like jojoba or argan oil) to your ends before wrapping to “seal” hydration overnight.
Ready to level up your hair game? Consistency is key. Learning how to wrap hair every night is the easiest way to ensure you wake up with manageable, salon-quality hair every single morning.
Expert Tips for Best Results
- Choose the Right Fabric: Always use 100% silk or high-quality satin. Synthetic blends can sometimes cause static or sweating.
- Don’t Wrap Too Tight: Ensure the wrap is secure enough to stay on, but not so tight that it pulls on your edges (hairline), which can lead to tension alopecia.
- Oil Your Ends: Apply a tiny drop of lightweight hair oil to your ends before wrapping to “seal” the hydration overnight.
Ready to level up your hair game? > Consistency is key! Wrapping your hair every night is the easiest way to ensure you wake up with manageable, salon-quality hair every single morning.
Book an Appointment
It’s easy and free!